"DREAM BEYOND WHAT YOU THINK IS POSSIBLE."
"DREAM BEYOND WHAT YOU THINK IS POSSIBLE."
In this tutorial you will learn how to upload image using C# .NET Window Application in database. Like png, jpg, jpeg, bmp etc. We are saving only image path in database and actual image saving in folder.
Create a New window form application C# in Microsoft Visual Studio.

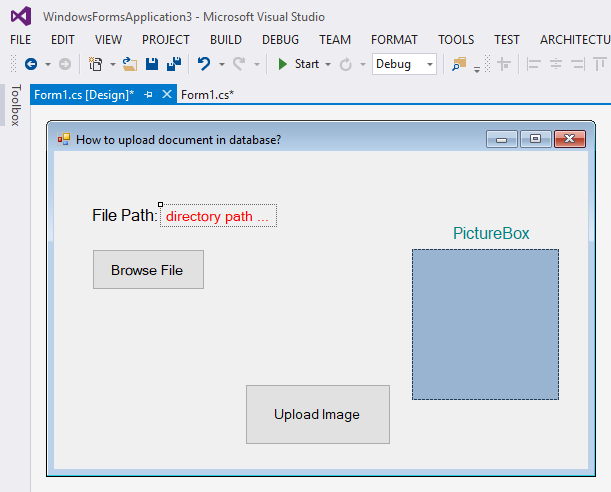
Now design your window form application like below form.
One button control for browse the image.
Second button control for uploading the image.
This control for open the file dialog box.
One PictureBox control for display the picture.
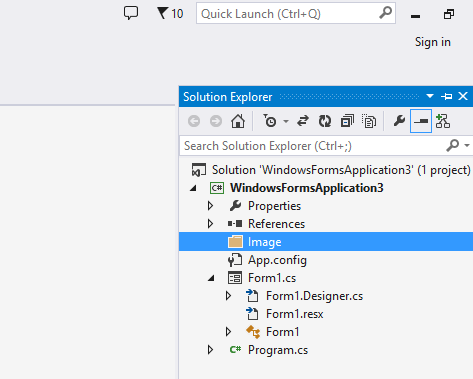
Now create a folder in solution explorer with any name. My folder name is Image. To create a folder simply move to solution explorer window or press Ctrl+Alt+L. Right click on your project, then click on Add and then click on New Folder. Give the folder name as you want.
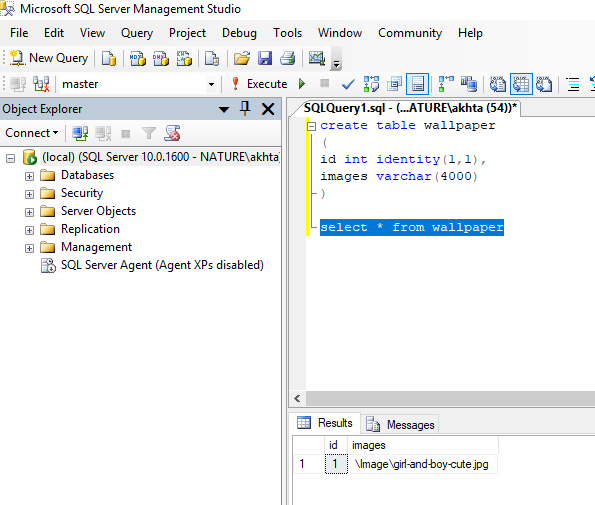
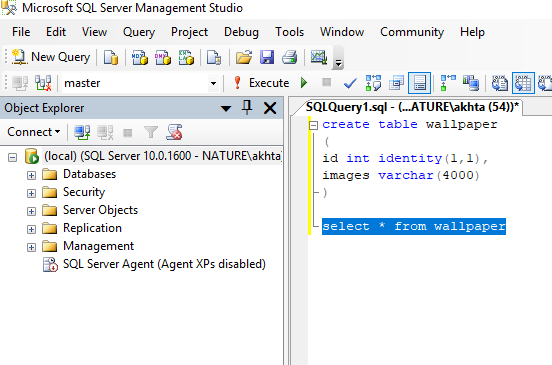
Open your Microsoft SQL Server and create a table like as below. My default database is master.
Now move to window form application(Form1.cs) and add following namespace in coding window. Simply double click on window form.
using System.Data.SqlClient;

Now create a connection string to connect with Database. Make your Connection globally like below so that you can access it anywhere in the form.
The connection string that includes the source database name, and other parameters needed to establish the initial connection.
using System;
using System.Collections.Generic;
using System.ComponentModel;
using System.Data;
using System.Drawing;
using System.Linq;
using System.Text;
using System.Threading.Tasks;
using System.Windows.Forms;
using System.Data.SqlClient;
namespace Intsert
{
public partial class Form1 : Form
{
public Form1()
{
InitializeComponent();
}
//globaly define conection
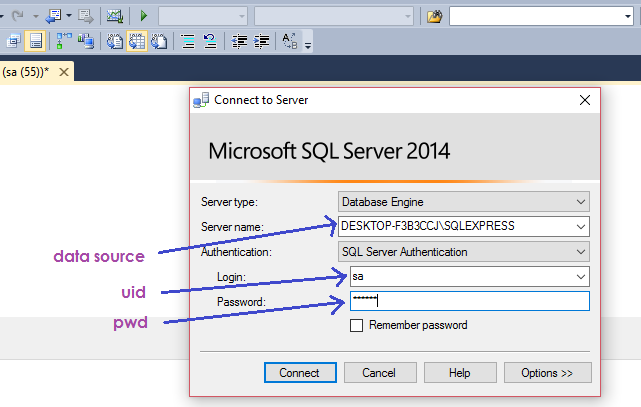
SqlConnection con = new SqlConnection("data source=DESKTOP-F3B3CCJ\SQLEXPRESS; database=master; uid=sa; password=123456;");
}
}
You will find your connection details in Sql Server. Open your Microsoft SQL Server.
Go to file menu → Connect Object Explorer….
Now move to window form design view and double click on browse button. Add following code on your browse button click.
	private void button1_Click(object sender, EventArgs e)
        {
           //To where your opendialog box get starting location. My initial directory location is desktop.
            openFileDialog1.InitialDirectory = "C://Desktop";
            //Your opendialog box title name.
            openFileDialog1.Title = "Select image to be upload.";
            //which type image format you want to upload in database. just add them.
            openFileDialog1.Filter = "Image Only(*.jpg; *.jpeg; *.gif; *.bmp; *.png)|*.jpg; *.jpeg; *.gif; *.bmp; *.png";
            //FilterIndex property represents the index of the filter currently selected in the file dialog box.
            openFileDialog1.FilterIndex = 1;
            try
            {
                if(openFileDialog1.ShowDialog() == System.Windows.Forms.DialogResult.OK)
                {
                    if(openFileDialog1.CheckFileExists)
                    {
                        string path = System.IO.Path.GetFullPath(openFileDialog1.FileName);
                        label1.Text = path;
                        pictureBox1.Image = new Bitmap(openFileDialog1.FileName);
                        pictureBox1.SizeMode = PictureBoxSizeMode.StretchImage;
                    }
                }
                else
                {
                    MessageBox.Show("Please Upload image.");
                }
            }
            catch(Exception ex)
            {
               //it will give if file is already exits..
                MessageBox.Show(ex.Message);
            }

        }
Now move to window form design view and double click on upload button. Add following code on your upload button click.
	private void button2_Click(object sender, EventArgs e)
        {
            try
            {
                string filename = System.IO.Path.GetFileName(openFileDialog1.FileName);
                if (filename == null)
                {
                    MessageBox.Show("Please select a valid image.");
                }
                else
                {
		    //we already define our connection globaly. We are just calling the object of connection.
                    con.Open();
                    SqlCommand cmd = new SqlCommand("insert into wallpaper (image)values('\\Image\\" + filename + "')",con);
                    string path = Application.StartupPath.Substring(0, (Application.StartupPath.Length - 10));
                    System.IO.File.Copy(openFileDialog1.FileName, path + "\\Image\\" + filename);
                    cmd.ExecuteNonQuery();
                    con.Close();
                    MessageBox.Show("Image uploaded successfully.");
                }
            }
            catch(Exception ex)
            {
                MessageBox.Show(ex.Message,"File Already exits");
            }
        }
Now run you window form application. Press f5 key from keyword or from start button in Visual Studio.
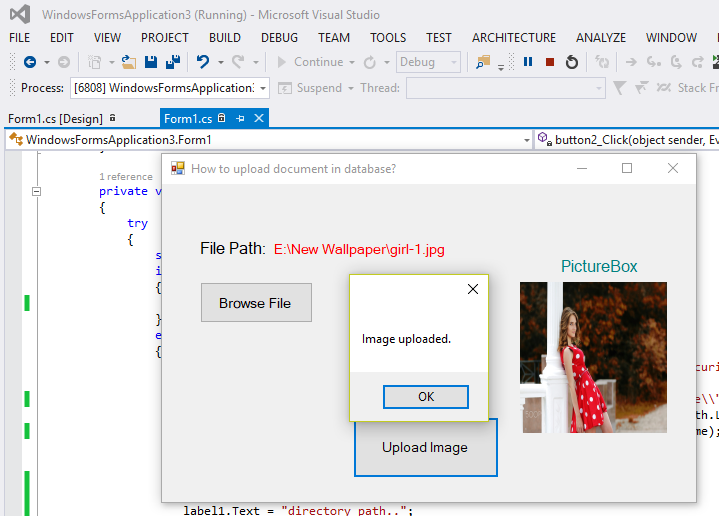
Now browse the image and click on upload button to upload the image in database.
Now move to Sql Server and check image is uploaded. Also check the path folder where actual image is saving.