"DREAM BEYOND WHAT YOU THINK IS POSSIBLE."
"DREAM BEYOND WHAT YOU THINK IS POSSIBLE."
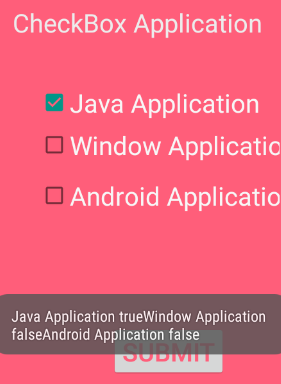
Checkbox application is use to allow to user to choose multiple item from given sets.
Like food application, where you can choose multiple food items.
Create new application with any name from file menu option.
File → New Project → Application name → select API → Add Blank Activity → Activity Name → finish.
In activity_main.xml layout file design your application.
Add following Controls:-

Import Package and write following coding in MainActivity.java class file.
    import android.widget.CheckBox;
    import android.widget.Toast;
    import android.view.View;
    import android.widget.Button;

    public class MainActivity extends ActionBarActivity {

    Button b1;
    CheckBox c1,c2,c3;

    @Override
    protected void onCreate(Bundle savedInstanceState) {
        super.onCreate(savedInstanceState);
        setContentView(R.layout.activity_main);
        b1=(Button)findViewById(R.id.button);
        c1=(CheckBox)findViewById(R.id.checkBox1);
        c2=(CheckBox)findViewById(R.id.checkBox2);
        c3=(CheckBox)findViewById(R.id.checkBox3);
        b1.setOnClickListener(new View.OnClickListener() {
            @Override
            public void onClick(View v) {
                if(c1.isChecked() || c2.isChecked() || c3.isChecked()) {
    StringBuffer str = new StringBuffer();
    str.append("Java Application ").append(c1.isChecked());
    str.append("Window Application ").append(c2.isChecked());
    str.append("Android Application ").append(c3.isChecked());
    Toast.makeText(MainActivity.this, str.toString(),
    Toast.LENGTH_LONG).show();
    }
    else
    {
    Toast.makeText(MainActivity.this,"Please Tick on CheckBox",
    Toast.LENGTH_LONG).show();
    }
        }
        });

    }