Update:- New tutorial added in HTML section. How to Create Responsive Login Page in HTML without Bootstrap?
CSS Introduction
CSS stands for Cascading Style Sheet Language, is a style sheet language used for describing the presentation of a document written in markup language (HTML) and is the preferred way for setting the look and feel of a website. Along with HTML and JavaScript, CSS is a cornerstone technology used by most websites to create visually engaging webpages, user interfaces for web applications, and user interfaces for many mobile applications.

The style sheets define the colour, size and position of text and other HTML tags, while the HTML files define the content and how it is organized. Separating them allows you to change the colour scheme without having to rewrite your entire web site.
The cascading means that a style applied to a parent element will also apply to all children elements within the parent. For example, setting the colour of body text will mean all headings and paragraphs within the body will also be the same colour.
Specifying Style Sheet
There are three main ways of including a style sheet for a web page or site:
- Linked - An external file linked to your HTML document.
- Embedded - A set of CSS rules included within your HTML document.
- In-line - CSS rules applied directly within an HTML tag.
- Imported - An external file imported into another file (typically a CSS file).
1. Linked CSS file
A linked style sheet contain only the CSS rules and nothing else. Do not include HTML tags in this file.
Copy the below CSS code or simply type it in Notepad or in Dreamweaver editor and save it with .css extension. Like style.css. You can give any name to your style sheet file but extension should be .css.
    body
    {
    	background-color:#f26724;
    }
    h1
    {
    	color:#f7f7f7;
    	font-size:22px;
    	font-family:Arial;
    }
    p
    {
    	color:#f7f7f7;
    	font-size:16px;
    	font-family:caliber;
    }
Now create a HTML page to apply the above CSS on that.
Copy the below HTML code or simply type it in Notepad or in Dreamweaver editor and save it with .html extension. Like mypage.html. You can give any name to your HTML file but extension should be .html.
Now link your above CSS file in the below HTML file. See the below Code.
    <!doctype html>
    <html>
    <head>
    <title>My First Html Page</title>
	<link href="style.css" rel="stylesheet">
    </head>
    <body>
    <h1>Welcome To Campuslife Website</h1>
    <p>Hello friends. This is my first web page.</p>
    </body>
    </html>
2. Embedded CSS file
With embedded CSS we don't have the CSS in a separate file but instead include it at the top of the HTML document within the head. We include it within a set of style tags.
Example of Embedded CSS
Copy the below Complete code or simply type it in Notepad or in Dreamweaver editor and save it with .html extension. Like mypage.html. You can give any name to your HTML file but extension should be .html.
    <!doctype html>
    <html>
    <head>
    <title>My First Html Page</title>
    <style type="text/css">
    body
    {
    	background-color:#f26724;
    }
    h1
    {
    	color:#f7f7f7;
    	font-size:22px;
    	font-family:Arial;
    }
    p
    {
    	color:#f7f7f7;
    	font-size:16px;
    	font-family:caliber;
    }
    </style>
    </head>
    <body>
    <h1>Welcome To Campuslife Website</h1>
    <p>Hello friends. This is my first web page.</p>
    </body>
    </html>
3. In-line CSS file
With In-line CSS we place the CSS code inside the HTML tags. Note: colours can be specified as either a CSS colour name or hex colour code.
Example of In-line CSS
    <!doctype html>
    <html>
    <head>
    <title>My First Html Page</title>
    </head>
    <body style="background-color:#f26724;">
    <h1 style="color:#f7f7f7; font-size:22px; font-family:Arial;">Welcome To Campuslife Website</h1>
    <p style="color:#f7f7f7; font-size:16px; font-family:caliber;">Hello friends. This is my first web page.</p>
    </body>
    </html>
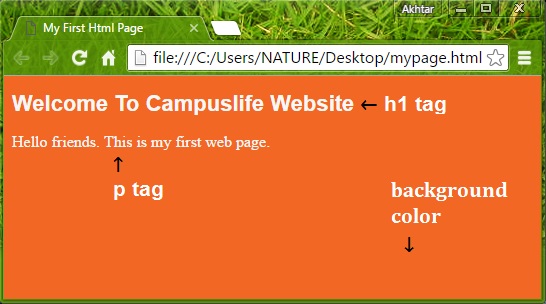
After making the Html file, Now run your html file (mypage.html) on browser by double click on it. Html file only run on Web browser.
Output

